Hi everyone,
I'm just posting a small post to let you all know my blog is going on a temporary hiatus.
Right now I'm very busy trying to find a job and then move out of my parents house. I'm so busy with other things and getting my life on track that my blog is the last thing I'm thinking about.
Apologies to everyone looking forward to posts but I'll definitely be picking up blogging again when I've got my own apartment and my own kitchen!
Love,
Laura

8/29/12


7/15/12
Holiday~
So, no update today... :(
Right now, I'm very busy packing because I'll be going on a 2-and-a-bit week holiday with a friend. And I'm leaving tonight! We're going to Lyon, Milan, Zürich and Copenhagen by train and I'm looking forward to it very much!
See you all when I get back.
<3
Right now, I'm very busy packing because I'll be going on a 2-and-a-bit week holiday with a friend. And I'm leaving tonight! We're going to Lyon, Milan, Zürich and Copenhagen by train and I'm looking forward to it very much!
See you all when I get back.
<3
7/8/12
Chocolate chip cupcakes with caramel and coffee frosting

These cupcakes were a real hit with my friends! Everyone especially liked the frosting, which made me feel so happy because it was a bit of an experiment. But they are right. These cupcakes are delicious! I love these chocolate chip cupcakes, with the right amount of chocolate chips in them so that they don’t overpower the cupcake but still leave so much chocolate to enjoy. The frosting is delicious, too. Not overly sweet and with a good taste of caramel with just hints of coffee that add a bit of depth to the frosting. All in all, a success that I’m proud to share with all of you!

Adapted from: The cupcakes are adapted from The Cupcake, published by Love Food (page 144) and the frosting is slightly adapted from Glorious Treats.
Makes: About 20 to 22 cupcakes
Ingredients
Cupcakes
- 200 gram self-raising flour
- 200 gram soft butter
- 200 gram caster sugar
- 2 large eggs, lightly beaten
- 200 gram chocolate chips (I used plain ones)
Frosting
- 500 gram powdered sugar
- 226 gram cream cheese
- 113 gram butter
- 4 tablespoons caramel sauce
- 3 tablespoons cold coffee
Directions
Cupcakes
- Preheat the oven to 190°C/375°F and put the paper cases in a tray (I did them 12 at the time since my oven won’t fit 2 muffin trays).
- Sift the flour into a large bowl. Then add the butter, sugar and the eggs and whisk/beat until the mixture is smooth. Add the chocolate chips and mix them with the batter.
- Fill the paper cases with the mixture and bake the cupcakes in 20 to 25 minutes. They’re done when they’re firm to the touch and golden.
- Transfer the cupcakes to a wire rack and leave them to cool. They should be entirely cooled down before you frost them.
Frosting
- In a large bowl, lightly beat the butter.
- Add the cream cheese and mix with the better for about a minute.
- Add the powdered sugar, caramel sauce and coffee and stir through the butter and cream cheese mixture with a spoon. When it’s mixed a bit, beat with a hand mixer for about 1 minute.
- Put the frosting into the ‘fridge to cool, about half an hour. I do this, so that when I pipe the frosting onto the cupcakes I have a firm frosting instead of one that’s ready to melt away. After frosting the cupcakes, I store them in a box in the ‘fridge, again, so the frosting won’t get runny.
~ Enjoy!
7/1/12
Apple, banana and pear smoothie

Apple, banana and pear smoothie
Adapted from: http://uktv.co.uk
Serves: this recipes makes about 1 litre
Ingredients
- 1 ripe banana, peeled and cut into chunks
- 2 medium Golden Delicious apples, peeled, cored, and cut into chunks (make sure the apples are peeled! I decided not to because I never peel my apples but the skin left some little crunchy bits behind in the smoothie)
- 1 ripe pear, peeled, cored, and cut into chunks
- 250 ml yogurt
- 250 ml apple juice
- pinches ground cinnamon
- Put everything into a blender and blend until the mixture is smooth.
~ Enjoy!
6/24/12
Citrus risotto with garlic shrimp

Don’t you just love shrimp? I know I do! So when I saw this recipe I wanted to make it right away because not only does it have shrimp in it, the shrimp is paired with risotto. I happen to like risotto, a lot. This is a bit different from the one I usually have (the one my mom makes that is to die for, really). This citrus risotto is bursting with flavor and the shrimp go so very well with the creamy, lemony risotto!
Citrus risotto with garlic shrimp
Adapted from: Bills Food by Bill Granger (page 88 Dutch edition)
Serves: 4
Ingredients
- 1,5 litre chicken stock
- 3 tablespoons olive oil
- 1 small onion, chopped
- 1 teaspoon salt
- 50 gram butter
- 330 gram Arborio rice
- Zest of 1 lemon
- 1 tablespoon lemon juice
- Black pepper
- 2 small red, Spanish chili’s
- 2 cloves garlic
- 20 shrimp (peeled, with the tail still attached to the shrimp. Make sure to remove the intestine)
Directions
- In a large pan with a thick bottom, heat one tablespoon of olive oil. Add the onion, salt and half the butter and heat until the onion turns glassy. Add the rice and stir for about 1 to 2 minutes, until the rice is completely mixed with the onion mixture.
- Gradually add the chicken stock to the rice (I use a small ladle and add one spoonful every time). Stir constantly and don’t add a new spoonful of stock before the previous spoon is soaked up by the rice completely. The recipe says it takes you about 20 minutes but I’d count on at least half an hour before the rice is creamy and al dente.
- Take the pan off the stove. Stir the remaining butter, lemon zest and lemon juice through the rice and add black pepper to taste. Put a lid over the pan and let it stand for a few minutes so the rice absorbs the flavours.
- Meanwhile, grind the red peppers and garlic. In a frying pan, heat the remaining olive oil over high heat.
- Season the shrimp with salt and pepper and put them in the pan. Fry them for about 2 minutes while shaking the pan. Add the chilli and garlic mixture and fry for another minute. Put the pan aside.
- Stir the risotto before dividing it over 4 bowls and put the shrimp on top before serving.
~ Enjoy!
6/17/12
Rolled oats, dark chocolate and strawberry muffins

For me, it takes a lot of time, effort and perseverance to lose weight. Not because I’m not motivated, but because I’m not just looking to lower my weight temporarily. I don’t want a quick fix. I want to change my eating-habits, make them healthier so I know I’m taking proper care of myself and my body.
So, to give myself a break every once in a while I decided that I’m allowed to have a nice muffin or other delicious snack in the weekend. But eating a muffin filled with sugar and butter isn’t going to make me feel good about myself. So instead, I made myself these delicious muffins. They’re healthy, using olive oil and honey, and very tasty with the strawberries and chocolate in them. A very nice treat I don’t feel guilty eating!

Adapted from: Smulweb (a Dutch recipe website)
Makes: about 14 muffins
Ingredients
- 150 gram whole-wheat flour
- 125 gram rolled oats
- 12 gram baking powder
- 75 gram dark chocolate (broken into little pieces)
- 235 ml milk
- 60 ml honey
- 30 ml olive oil
- 2 egg whites
- Handful strawberries (sliced in quarters)
- Pinch of salt
Directions
- Preheat the oven to 220°C/430°F and put the paper cases in a muffin tray.
- Mix all the dry ingredients (including the chocolate) in a bowl.
- Add the olive oil, milk, egg whites and strawberries and mix. If the mixture is a bit dry, add a bit more milk.
- Fill the paper cases about 2/3 with the batter and bake in the oven for about 17 minutes and then transfer the muffins to a wire rack to cool.
~ Enjoy!
6/10/12
Pasta pesto with ricotta and chicken

But she is very right in liking this dish, because it IS absolutely delicious! It’s quite a simple dish, quick and with little ingredients. But the ingredients that are in there go perfect together. The original recipe used heavy cream but I decided to use ricotta instead and, in my opinion, it works perfectly! The ricotta takes a bit off the strong taste of the pesto away and mellows it very nicely so it doesn’t take over the entire dish.
Pasta pesto with ricotta and chicken
Adapted from: Martha Stewart
Serves: 3
Ingredients
- 2 boneless chicken breasts, cut into strips (about 445 gram)
- 100 gram pesto
- 250 gram fettuccini
- 3 tablespoons ricotta
- 1 tablespoon olive oil
- Salt and pepper
- Parmesan cheese
Directions
- In a frying pan, heat the olive oil. Add the chicken, season with salt and pepper and cook until golden and cooked through. Cover the pan to keep the chicken warm.
- In a small saucepan, heat the pesto over low heat until it starts to turn liquid. Add the ricotta and stir until all the ricotta is mixed with the pesto.
- Meanwhile, cook the pasta according to the package instructions. Before draining the pasta, make sure to catch a little of the cooking water (about 50 ml.).
- Stir the cooking water through the pesto and ricotta mixture.
- In a large bowl toss the chicken, pasta and pesto and ricotta mixture and serve with some fresh parmesan cheese.
~ Enjoy!
6/4/12
Chili and Garlic Eggplant

The Chili and Garlic Eggplant is absolutely delicious! The dish is spicy but not overly so and the eggplant is so soft and smooth it all but melts on your tongue! I love to make it and serve it together with the Gong Bao Chicken and white rice.

Adapted from: Cloud 9 Restaurant in Yanshuo
Serves: 3
Ingredients
- 250 gram eggplant, cut into 4cm long strings
- 1 red pepper, de-seeded and cut into 4 cm long strings
- 1 green pepper, de-seeded and cut into 4 cm long strings
- 4 cloves garlic, chopped
- 2 pieces of spring onion, cut into 1 inch pieces
- 1 tablespoon chili bean paste
- 4 tablespoons oil
- 2 teaspoons oyster sauce
- 1 teaspoon soy sauce
- ½ teaspoon salt
- ½ teaspoon sugar
- Water
Directions
- Put the eggplant in salty water and let it stand for about 10 minutes before removing it (I was told during the class that it helps to get rid of the bitter flavor and the dish needs less oil this way).
- Heat the wok with the oil. On medium heat, stir-fry the eggplant until it starts looking a bit brownish and it gets soft. Remove the eggplant from the wok and put aside.
- In the wok, on low heat, fry the garlic and chili bean paste.
- Return the eggplant and add enough water so that half of the dish is covered. Then add the oyster sauce, soy sauce, salt and sugar.
- When the eggplant is soft and the sauce is thick, add the spring onion. If the sauce is still watery, add some cornstarch.
~ Enjoy!
5/27/12
Raspberry Loaf

I’ve had some trouble with baking loaves and previously I always blamed our oven. Useless thing, I used to say. The temperature is off by about 15°C and I thought that for most of my cakes to fail, there had to be something else wrong with the oven, right? Wrong. As it turned out, there was nothing wrong with the oven. Just with the ingredients I was using. I swear, I’ll never buy “large” eggs again. What a foolish mistake! Of course my cake is going to fail if I’m using “large” eggs instead of “medium”…
So, the moment I figured it out I baked a loaf. And it came out perfectly! This is a great raspberry loaf with a slightly sweet flavor and adding the mint really makes it special!
Raspberry loaf
Adapted from: Sophie’s savory loaves by Sophie Dudemaine (page 67 in the Dutch edition)
This recipe makes 1 loaf
Ingredients
- 3 eggs (medium!)
- 170 gram sugar
- 160 gram flour
- ± 2 gram instant yeast (the recipe calls for 1/3 package)
- 150 gram butter (lightly salted. If not available, add a pinch of salt to the butter instead)
- 200 gram raspberries
- 6 mint leaves
Method
- Pre-heat oven to 180°C. Lightly grease a loaf pan and sprinkle with flour.
- In a bowl, whisk the eggs and sugar until the mixture is light and slightly fluffy.
- Melt the butter and spoon it through the egg-and-sugar mixture.
- Puree the raspberry and mint before adding it to the batter.
- Pour the batter into the loaf pan and bake for about 40 minutes.
~Enjoy!
5/13/12
Cajun Corn Chowder

Now, we have corn at least once a week and to me, it never gets old. This is a recipe my mom once made for us and I absolutely loved it. So much that now I’m making it myself, too. It’s such a flavorful! The corn is absolutely amazing and it’s both creamy and spicy at the same time.
Cajun corn chowder
Adapted from: Spices by Manisha Gambhir Harkins (page 15 in the Dutch edition)
Serves: 4
Ingredients
- 475 gram canned corn (you can use cobs if you want. You’ll need about 4.)
- 25 gram butter
- 1 onion, chopped
- 1 celery rib, chopped
- 5 slices of bacon, sliced into small pieces
- 3 teaspoons Cajun herbs (see below)
- 1 ¼ liter vegetable stock
- 250 ml cooking cream
Method
- In a Dutch oven, melt the butter. Add the onion and sweat for about 5 minutes. Add the celery and braise for about 3 minutes until the celery has softened. Add the corn and Cajun herbs (start with 2 tablespoons and then add more to taste since it’s quite spicy). Stir well.
- Add the vegetable stock and bring to a boil. Turn down the heat and let the soup simmer for about 15 minutes. When you use cobs, let it simmer for about 35 minutes since canned corn is pre-cooked so it needs less time (at least, in the Netherlands it is).
- Add the cooking cream and, over a low heat, let the soup boil to your desired thickness.
- Optional: pour the soup into the kitchen blender and mix until it’s smooth. Return the soup to the pan.
- Add the bacon.
Cajun herbs
- ½ teaspoon black pepper corns
- ½ teaspoon white pepper corns
- 1 teaspoon cumin seeds
- 1 teaspoon coriander seeds
- 1 teaspoon cayenne pepper
- 1 teaspoon celery salt
Grind all the spices together and store, sealed, in a dark spot.
The Cajun herbs can also be used with fish and meats.
~Enjoy!
5/6/12
Slightly spicy zucchini pasta with parmesan cheese

As for zucchini, I’ve grown to like it a lot. Especially on the grill, it’s delicious that way! But this pasta is a great way to eat it, too. It’s a super-easy dish, quick and delicious too. It’s not what I’d say a pasta-sauce but it is so good with the rich flavor of the zucchini, the spiciness of the chili and the parmesan cheese just wraps up the dish in a great way.
Slightly spicy zucchini pasta with parmesan cheese
Adapted from: Ainsley Harriott's Friends & Family Cookbook
Serves: 4
Ingredients
- 4 tablespoons olive oil
- 2 shallots, chopped
- 500 gram zucchini, cleaned and cut into cubes
- 2 cloves garlic, chopped
- 2 teaspoons chopped thyme
- 1 teaspoon dried chili flakes
- 300 gram lint pasta (the recipe calls for fettuccine but I used spaghetti)
- 25 gram butter
- 2 tablespoons chopped parsley
- 4 tablespoons grated parmesan cheese
- Salt and pepper
Method
- Heat the olive oil in a pan over medium heat. Add the shallot and sweat for about 5 minutes.
- Add the zucchini, garlic, thyme, chili flakes and some salt and pepper to taste. Stir occasionally and let it stew for about 5 minutes.
- Meanwhile, boil the pasta in salted water like you usually do (or as the package suggests). When it’s done, drain the pasta and stir in the butter and parsley.
- Stir the zucchini mixture through the pasta, ground over some pepper and sprinkle the parmesan on top.
~Enjoy!
4/30/12
Banana & yogurt muffins with chocolate spread

So when a friend of mine gifted me a Muffin Maker she found stored on the attic, I was stoked to try this recipe! It was a total failure. Not because the recipe sucked, because the batter tasted great and even the poor, failed muffins tasted… decent. But because the Muffin Maker was such a bad, bad piece of kitchen appliance that it will now never see the light of day again. I hadn’t expected the Muffin Maker to make good, proper cupcakes. I’m not that delusional. But I’d hoped for a better result than a muffin with a black bottom, a colorless top and everything in-between unbaked.
So, after that fiasco I still hadn’t tried this recipe properly. So when I got myself a new heart-shaped muffin pan, this was the one I was going to make! And it was delicious. It’s quite a dense muffin because of the banana but the taste is very good with the banana and the yoghurt and the chocolate spread on top just made it a tad bit more special.

Banana & yogurt muffins with chocolate spread
Adapted from: www.taste.com.au
Serves: 12 muffins
Ingredients
- 1 3/4 cups self-rising flour
- 1/2 cup caster sugar
- 1 cup natural yoghurt
- 1 egg
- 2/3 cup vegetable oil
- 2 large bananas, mashed
- Chocolate spread (Nutella for example)
Method
- Preheat oven to 180°C. Lightly grease a 12-hole, 1/3 cup-capacity muffin pan.
- Sift flour and sugar into a bowl.
- Combine yoghurt, egg, oil and 1 cup mashed banana in a large bowl. Gradually add dry ingredients, stirring until just combined.
- Spoon mixture into muffin holes. Bake for 20 to 25 minutes or until a skewer inserted into the centre comes out clean.
- Stand muffins in pan for 5 minutes
- Turn onto a wire rack and spread a thin layer of the chocolate spread over the top of the muffin. The fact that the muffin is still a bit warm will melt the chocolate spread a bit, making it easier to cover the top of the muffin.
- Put muffins in the ‘fridge to cool completely (I put them in the ‘fridge to keep the chocolate spread from melting completely down the sides).
- Take the muffins out of the ‘fridge to get to room temperature before serving.
~Enjoy!

4/22/12
Tomato and parmesan pasta sauce

For a while now I’ve tried to make my own pasta sauce. Most times I failed miserably until I made this one! Admittedly, it’s not as great as your real, delicious Italian sauce but it’s a great sauce nonetheless. My family loved it and to me, that’s the most important thing, really. So, I hope you will enjoy it too. Here it is.
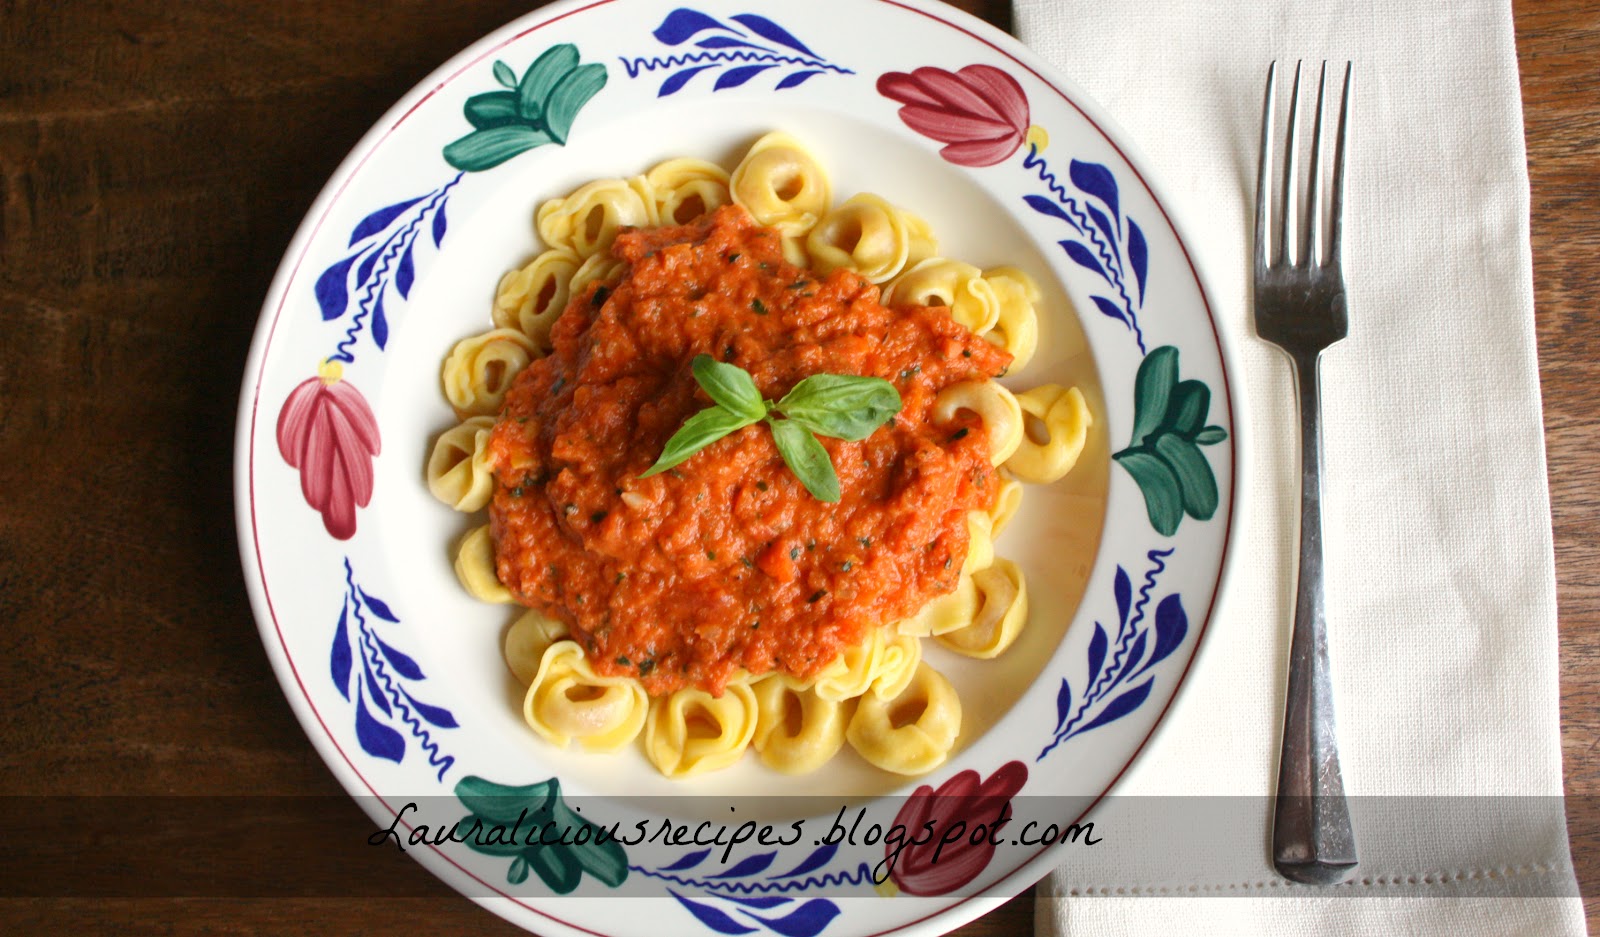
Serves: 10
Ingredients
- 800 gram canned tomato (2 cans 400 gram, try to get them “diced” if possible)
- 65 gram tomato paste
- 125 gram crème fraîche
- 150 gram carrot – cut into cubes
- 100 gram parmesan cheese
- 1 onion – chopped
- 2 gloves garlic – chopped
- ½ yellow pepper – cut into cubes
- ± 4 tablespoons Fresh basil
- 1 tablespoon olive oil
- 1 teaspoon sugar
- 1 teaspoon thyme
- 1 teaspoon oregano
- ½ teaspoon salt
Note: You need a kitchen blender for this recipe
Directions
- Heat the olive oil in a pan over medium heat. Add the garlic and fry for about 30 seconds. Add the carrot, onion, pepper and cook for about 5 minutes.
- Add the thyme and oregano and cook for another 5 minutes.
- Add the canned tomato, tomato paste, sugar and salt. Stir well before adding the crème fraîche. Let the sauce simmer for another 5 minutes.
- Add the basil and parmesan to the sauce before pouring it into the kitchen blender. Blend until the sauce is smooth but with a few small chunks of vegetable.
- If you want, add a bit of corn starch to thicken the sauce.
- Serve the sauce with tortellini, they go great together!
~ Enjoy!
4/15/12
Gong Bao Chicken

So last summer I went on a 3-week trip to China. Now, China is absolutely amazing! If you ever get the chance of going there for a holiday, take it and go. So, in China I was overjoyed when I found out that in Yanshuo I could sign up for a cooking class! Of course, I went and I had the greatest fun!

I had my own station and we all cooked three different dishes.
All in all, I had a great time and the food was just amazing! It’s take-out, but better! Honestly, I am in love with this dish. It’s full of flavor, spicy and not greasy at all!
I must admit that China ruined me. Because of course, here we’re eating westernized versions of the food they really eat in China. And I find now that I’ve had real, proper Chinese food for three weeks (even though I was SO happy to come home and eat something other than Chinese food) take-out just isn’t the same anymore. I like it, as I said, but it just isn’t the Chinese food I had on my trip. But at least I have the recipes of the cooking class to help me make that food again! Here’s the first one:
Gong Bao Chicken
Adapted from: Cloud 9 Restaurant in Yanshuo
Yields: 3
Ingredients
- 250 gram chicken breast, cut into cubes
- 1 red pepper, de-seeded and cut into cubes
- 1 green pepper, de-seeded and cut into cubes
- 20 gram cucumber, seeds removed and cut into cubes
- 20 gram carrots, cut into cubes
- 2 cloves garlic, minced
- Small piece of ginger, minced (I’d say use about 1,5 centimeter or more if you like ginger a lot)
- 6 pieces dried red chili, make a 1 inch cut in the chili (the original recipe called for 10 red chili’s but I found that 6 made the dish spicy enough for me)
- 2 pieces of spring onion, cut into 1 inch pieces
- 20 gram deep fried peanuts
- 3 tablespoons oil
- 2 teaspoons soy sauce
- 2 teaspoons oyster sauce
- ½ teaspoon salt
- ½ teaspoon chicken stock
- 1 teaspoon Sichuan numb pepper
- Pinch of sugar
- Water
Ingredients for the marinade:
- ¼ teaspoon salt
- ½ table spoon cooking oil
- 1 teaspoon rice wine
- 1 teaspoon corn starch
- 1 egg white
Directions:
- Mix all the ingredients for the marinade. Marinade the chicken and put aside for about 5 minutes.
- Heat a wok and put in 3 tablespoons of oil. Stir-fry the chicken and move it out when it’s about 80% done.
- With the oil still in the wok, stir-fry the garlic, ginger and dried chili’s over a low heat.
- Put the rest of the vegetables in except the spring onions. Stir-fry the vegetables and when they’re about halfway done, add a little water (only add a little. When you’re done with the dish you can always thin it out with some extra water if you think it’s too thick).
- Season the dish with the soy sauce, oyster sauce, salt, chicken stock and sugar.
- Add the chicken to the vegetables, put in the Sichuan numb pepper and stir-fry for about 2 minutes over a low heat.
- Add the spring onions and peanuts, heat them with the dish for about a minute and then serve your Gong Bao Chicken.
~Enjoy!
4/8/12
Chocolate cupcakes with cream cheese frosting

I absolutely love cupcakes and seriously, who doesn’t? But, if I’m completely honest, I must admit that I do find buttercream frosting to be overly sweet most of the time. So when my grandma asked me to bake her cupcakes for her birthday I decided to try this Cream cheese frosting I found on Glorious Treats instead of the buttercream I’d made up until now.
And now, I’m hooked. I loved this frosting that was still sweet but not overly so and it went amazing with the chocolate cupcakes I made! They were a real hit at the party too and some people were surprised that I’d made them since they thought they were bought in the store. Kudos for me and this is definitely a recipe I’ll be making again!
Chocolate cupcakes with cream cheese frosting
Adapted from: Cupcake from 500 Cupcakes and the frosting from Glorious Treats
Yields: ± 15 cupcakes
Ingredients for the cupcake
- 230 gram self raising flour
- 1 teaspoon baking powder
- 230 gram light brown sugar
- 230 gram soft butter
- 2 eggs, white and yolk separated
- 100 gram dark chocolate, melted
- 1 teaspoon vanilla essence
- 125 ml milk
Ingredients for the cream cheese frosting
- ½ cup butter (set at room temp about 10 minutes, but should still be cool)
- 8 oz. cream cheese (directly from fridge)
- 1 teaspoon vanilla extract
- 4 cups powdered confectioners’ sugar
- 1 to 4 Tablespoons heavy cream, heavy whipping cream (or milk- although I do like the richness that cream adds)
Directions
Cupcakes
- Preheat oven to 175°C/345°F and put the paper cases in a muffin tray.
- Sift the baking powder and put aside.
- In a medium-bowl whisk the sugar and butter until it’s creamy and light. Mix the egg yolks in and then fold the melted chocolate and vanilla essence trough the mixture.
- Add the baking powder and milk bit by bit until they’re mixed completely through the batter.
- In a clean bowl, whisk the egg white until it’s firm and then fold it through the batter.
- Fill the paper cases with the batter and bake in the oven for about 20 minutes and then transfer the cupcakes to a wire rack to cool.
Frosting
- Place butter in a large mixing bowl and blend slightly. Add cream cheese and blend until combined, about 30 seconds.
- Add vanilla extract and powdered sugar and blend on low speed until combined. Increase to medium speed and beat until it begins to get fluffy.
- Slowly add the heavy cream, a little bit at a time until desired consistency is met (don't add too much if you want the frosting to stay in place when piped on cupcakes).
- Beat until fluffy, about 1 minute (if you want, add some food colouring now).
- Frost your cupcakes and add any other kind of decorations.
~ Enjoy!
4/1/12
Spring spinach salad with brie, apple and chicken

Really, I don’t like winter. It’s cold and even worse, there’s snow. So when Spring hits I get excited, go outside more often and, for some reason, I start to crave salads. Instead of a hearty, warm meal I suddenly want to eat light, cold or lukewarm salads that particularly shout Spring!
When I saw the recipe for this salad I knew I wanted to make something like it but not exactly what I found online. First off, I wanted chicken in my salad so I took the liberty to add chicken. Secondly, I don’t have a broiler so I turned creative and found some other way to make a normal, boring apple a lot more special then it usually is.
In the end, I’m glad I made it the way I wanted to because the salad was absolutely delicious! I even ate it two nights in a row and my family loved it just as much as I did. An empty salad bowl was proof for that. The sweetness of the apple goes wonderful with the chicken, creamy brie and slightly tough spinach. It’s a great combination and definitely a Spring-dish to me!

Spring spinach salad with brie, apple and chicken
Inspiration from: Tase of Home
Yields: 3 person main-course salad
Ingredients for the salad
- 200 gram spinach, cleaned
- 180 gram brie, cut into small pieces
- 2 chicken breasts
- 1 ½ apple, diced
- 1 ½ tablespoon maple syrup
- 1 litre vegetable stock
Ingredients for the dressing
- 3 tablespoons extra virgin olive oil
- 1 ½ tablespoon balsamic vinegar
- 2 teaspoons maple syrup
- 1 teaspoon Dijon mustard
Directions
- Boil the chicken in the vegetable stock for about 15 minutes until it’s cooked. Drain the chicken and cut it into small pieces.
- Coat the diced apple with the maple syrup and heat them in a pan until the apple has soaked up all the syrup.
- Mix all the ingredients for the dressing.
- Combine the spinach, brie, chicken and apple in a large salad bowl. Pour the dressing over the salad and toss until combined.
Tips:
• Instead of using brie, this salad would also taste great with a “heavier” cheese such as Gorgonzola
~ Enjoy!

3/27/12
My first award!
Thanks so much Anisha from Anisha's Platter! I'm so honoured that you liked my blog and gave me this award. Thank you.

Now I have to share this award with 5 other bloggers who each have a wonderful blog worth a visit. Be sure to check them out!
The chosen ones are :
If you accept the award:
The chosen ones are :
- Gerlinda from Cooking Weekends
- Julia from Delectameals
- Abby from Seaweed & Sassafras
- Soni from Soni's Food for Thought
- "Wifey" from Wifey With a Knifey
If you accept the award:
- Copy and paste the award on your blog. Link back to the blogger who gave you the award.
- Pick your five favorite blogs with less than 200 followers who deserve to be noticed and leave a comment on their blog to let them know they have received the award.
- Hope that the five blogs chosen will keep spreading the love and pass it on to five moreblogs.
3/25/12
Banana Cake

Hurray! Today is my mum’s birthday and the entire family came by to celebrate with us. And with a birthday comes cake. A banana cake in this case.
Since a while I’ve started to love bananas more and more. I used to never eat fruit. A bad habit, yes I know, but I just didn’t like most fruits we have lying around the house (apples, tangerines). So instead of going to the store and buying fruit that I did like, I just never ate it.
But I’m taking a turn in my life now and want to be a bit healthier. Which means watching the amounts of food I eat (since over-eating is nice when you’re eating but not so much after), going out skating two times a week AND start eating fruit. So now I’m being a good girl, eating a banana and a pear a day.
So I offered to bake a cake for my mum’s birthday party and started going through the book and I knew I wanted to make this banana cake the moment I saw it. Granted, this is far from healthy but hey, it’s a birthday cake.
This banana cake is very firm so if you want your guests to eat any of the snacks you’ve made for after the cake-and-coffee-round I advise you give them a small piece each. But the flavor is very nice! The bottom is still a tiny bit moist and the cake has soaked up all the flavor of the banana put into it. The frosting on top is nice, not too sweet and it gives the cake a nice and creamy touch.

Banana cake
Adapted from: 500 cakes
Yields: 8 persons
Note: I made the recipe twice since I wanted a big cake for the entire family, so the cake in the picture is twice the size of what the recipe is for
Ingredients for the cake
- 2 ripe bananas
- 2 eggs
- 175 ml vegetable oil
- 3 tablespoons milk
- 300 gram light brown sugar
- 150 gram flour
- 2 teaspoons baking powder
- Salt
- 1 teaspoon cinnamon powder
- ½ teaspoon ginger powder
Ingredients for the cream cheese frosting
- 200 gram cream cheese
- 85 gram confectioner’s sugar
- 2 teaspoons lemon juice
- 1 banana (optional to put on top of the frosting)
Directions
- Preheat the oven at 180 °C (350 °F) and grease an 7 inch cake pan. If you use one of these (like I do) I suggest you cover the bottom with baking paper.
- Mash the bananas in a large bowl and whisk the eggs through the mash.
- Stir the vegetable oil and milk through the mixture.
- Sieve any lumps out of the sugar before adding it to the mixture. Stir well.
- Sieve the flour, baking powder, cinnamon powder and ginger powder into the mixture, add a pinch of salt and fold it into the banana mixture.
- Pour the batter into the cake pan and bake for about 45 minutes. The recipe said to bake the cake for 1 hour but mine (while making twice the recipe but using a bigger cake pan) was done at 45 minutes.
- Let the cake cool.
- In a bowl, mix the cream cheese, confectioner’s sugar and lemon juice until it’s a smooth, creamy mixture.
- Spread the frosting over the cooled cake. Decorate with the third banana and sprinkle a bit of cinnamon powder over the top.

~ Enjoy!

3/11/12
Healthy apple and honey muffins

For this batch, I decided that I wanted my muffins to be a bit more fancy than they usually are. So, I added a glaced apple on top and not only did it look much nicer it also tasted great!
This recipe makes 12
Ingredients
Muffin
2 egg-whites
240 gram wholemeal flour
170 ml. milk
110 gram apple, in small cubes
4 tablespoons sunflower oil
4 tablespoons honey
1 tablespoon baking powder
1 teaspoon cinnamon
½ teaspoon salt
Topping
± 1 ½ apples
75 gram packed brown sugar
2 tablespoons melted butter
1 teaspoon cinnamon
Recipe
Pre-heat the oven at 190°C and grease a muffin-tray with butter.
A side-note: I advice you put a small piece of baking paper on the bottom of the muffin-tray. I didn’t do this while preparing the recipe but I think it will help you lots in getting the apple-topping out.
Topping
- Combine the brown sugar, the cinnamon, and the melted butter and put the mixture on the bottom of the muffin-tray.
- Core the apples and cut into ¼ inch rounds (see picture below). I drew a circle around my muffin-tray to know how big the rounds should be. If you don’t want to go through the trouble, just cut the apple into parts and cover the sugar-mixture with the apple. It should be about a ¼ inch layer of apple that covers the mixture.

Muffin
- Lightly whisk the egg-white and mix the dry ingredients in another bowl.
- In another bowl, mix the milk, oil, honey and apple. Then carefully mix in the egg-white.
- Add the wet ingredients to the dry ones and mix until you get a light but firm batter.
- Fill the muffin-tray with the batter. Usually you fill them about 2/3 but I filled them up almost completely to the brim. That’s because when they’re done, you’ll need to cut off the top of the muffin in order to properly flip the tray over.
- Bake for about 20 minutes until the muffins are light-brown.
- Let the tray cool for about 10 minutes before running a knife along the top of the muffin-tray, removing the tops of your muffins.
- Flip the tray over above a wire-rack so the muffins fall out. If the apple sticks to the bottom of the tray, scrap it out and place on top of the muffins.
- These muffins are best while still hot with a scoop of vanilla ice-cream.
~ Enjoy!
3/3/12
Lauralicious Recipes now on Facebook!
After having been sick most of the past week I've finally had time to make Lauralicious Recipes its own Facebook Page!
Go check it out and like it!
And just for fun, here's a nice pic I took a while ago of a batch of mini-pineapple-muffins. The recipe is far from share-able but the pic came out nice nonetheless!

Go check it out and like it!
And just for fun, here's a nice pic I took a while ago of a batch of mini-pineapple-muffins. The recipe is far from share-able but the pic came out nice nonetheless!

Now, don't forget to go to Lauralicious Recipes Facebook page!
Subscribe to:
Posts (Atom)